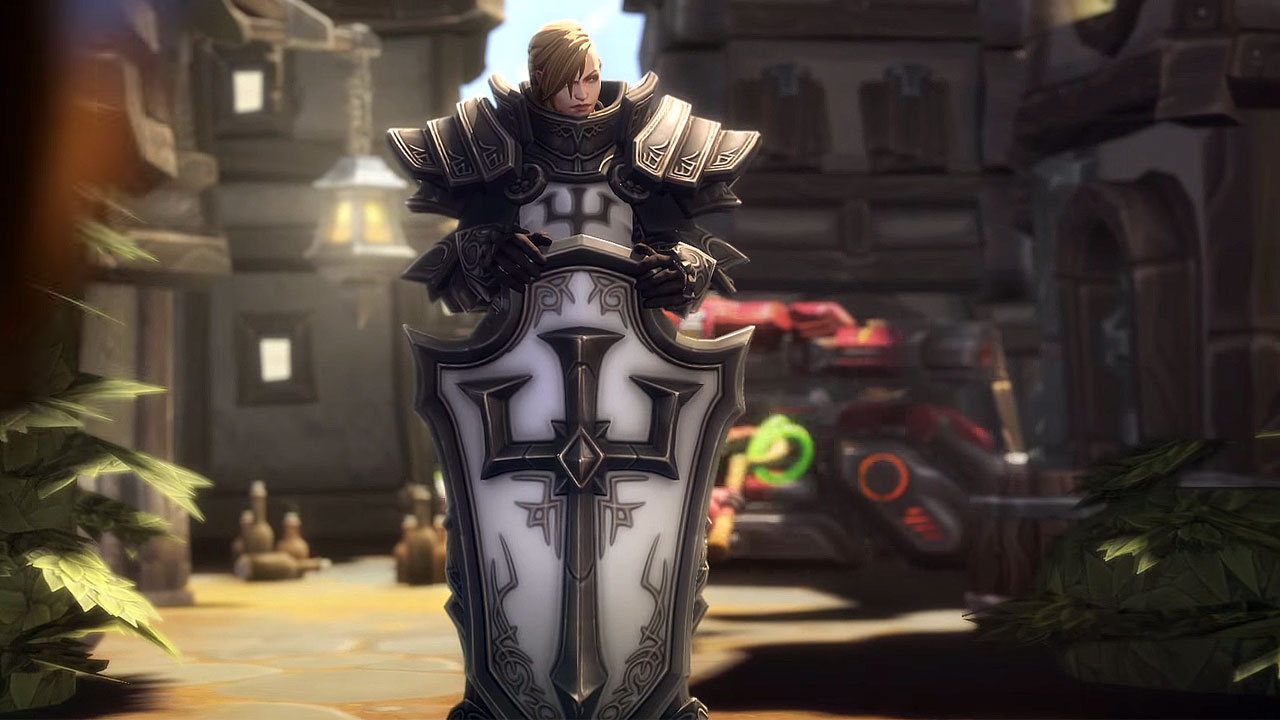
If you’re only going to learn how to play one tank in Heroes of the Storm, make it Johanna. There’s really never a bad time to pick her, she’s good at everything a tank wants to be good at and she works well with any team composition. She has great displacement, crowd control, peeling, and she’s incredibly hard to kill thanks to her trait, Iron Skin. She’s easily the most generally effective tank in the game — other tanks might be more effective in certain situations, but no one fits into every team composition like our girl Jo does.
** updated for the November 2017 Alexstrasza patch **
First, let’s look at her trait.
Trait – Iron Skin (D)
Become unstoppable and gain a shield that absorbs damage for 4 seconds.
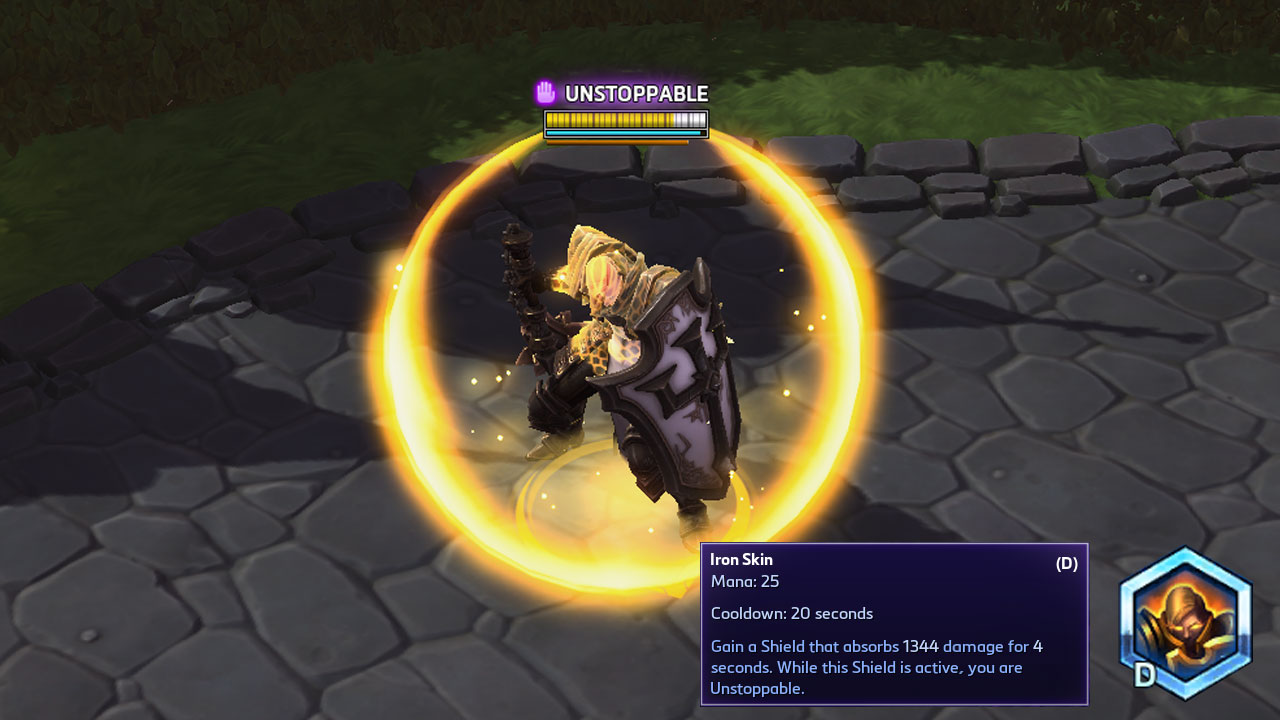
Iron Skin is key to Jo’s playstyle, because it lets her play like an idiot. Jo loves getting dirty. She wants to get in the mix and make things happen. While other tanks are skirting the perimeter of a fight and waiting for the right moment, Jo is charging into the fray and disrupting the enemy’s positioning with Condemn (W). Johanna doesn’t wait for the right moment, she makes the right moment.
Iron Skin is both an excellent engage and disengage, but you’ll only be able to use it for one or the other due to its 20 second cooldown. A big part of playing Jo correctly is recognizing when you actually need Iron Skin. It’s tempting to activate it as you rush into a fight, but that means you’re opening yourself up to being targeted and bursted down, since the enemy team knows you won’t be able to use it again for 16 seconds after it wears off. More often than not, it’s best saved for use mid-fight or at the end of a fight to escape.
You won’t necessarily always use Iron Skin for its shield, sometimes you purely want the unstoppable effect. For instance, maybe the enemy Malfurion rooted your team and is about to setup a combo. Rather than waiting for the enemy players to drop all their damage, you might want to activate Iron Skin right away, breaking the root and allowing you to charge directly into the enemy team and disrupt their combo with a Condemn or Blessed Shield.
Preemptively using Iron Skin for the unstoppable effect can also be good if you are expecting a stun from an enemy Tyrande, Muradin, Kerrigan, etc. You can’t use Iron Skin if you’re already stunned, but activating it before an enemy uses their ability means they’ll never get the chance to stun you in the first place. If you have quick enough reflexes, you can even activate Iron Skin just as the enemy uses their stun (some stuns are easier to react to than others).
Now let’s go over Johanna’s abilities, which all deal low-to-moderate damage in a wide area. She doesn’t do a lot of damage to a single target, but she’s constantly hitting multiple enemies and that adds up.
Punish (Q)
Step forward dealing damage and slowing enemies by 60% decaying over 2 seconds.

Punish is a cleave attack that slows enemies. Punish is best used as a followup to Condemn (W), but it’s also quite useful for peeling. When your teammates need to run from the enemy, you can stay behind and use Punish to slow the enemy team and keep them from reaching your friends.
Condemn (W)
After 1 second, you pull nearby enemies toward you, stunning them for 0.25 seconds and dealing damage.
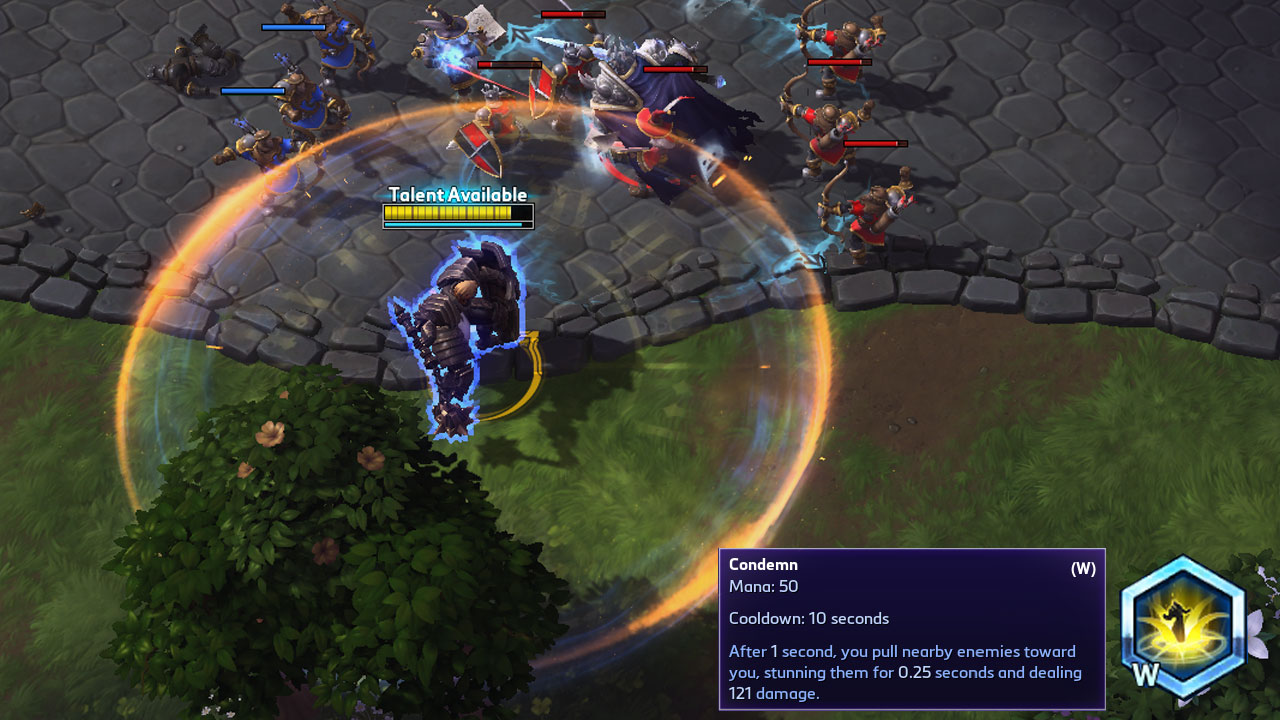
Condemn is Johanna’s go-to ability. Its huge radius, pulling effect, and brief stun are devastating; Jo can potentially disrupt the positioning of an entire enemy team and set them up for disaster. It’s up to Jo’s teammates to follow up Condemns with big damage, and a good Jo will give her friends plenty of opportunities to do so. Not every Condemn needs to setup a huge engagement though; sometimes you may want to section off a single target on the edge of a fight.
Always follow up your Condemns with Punish (Q). Condemn is powerful on its own, but if you combo it into Punish, your enemies will be crippled as they attempt to re-position themselves, which gives your team further opportunities to damage them.
Condemn is also very useful against minion waves. A nice trick that Jo can use when she’s in lane is to Condemn an enemy minion wave and drag it to a more favorable position. Jo can pull the enemy wave back, forcing the enemy team to fight closer to her own Towers for extra defense, or, she can pull the enemy wave forward, allowing her own wave closer to the enemy’s Towers and adding pressure to the lane.
Shield Glare (E)
Deal damage to enemies and cause them to miss Basic Attacks for 1.5 seconds.
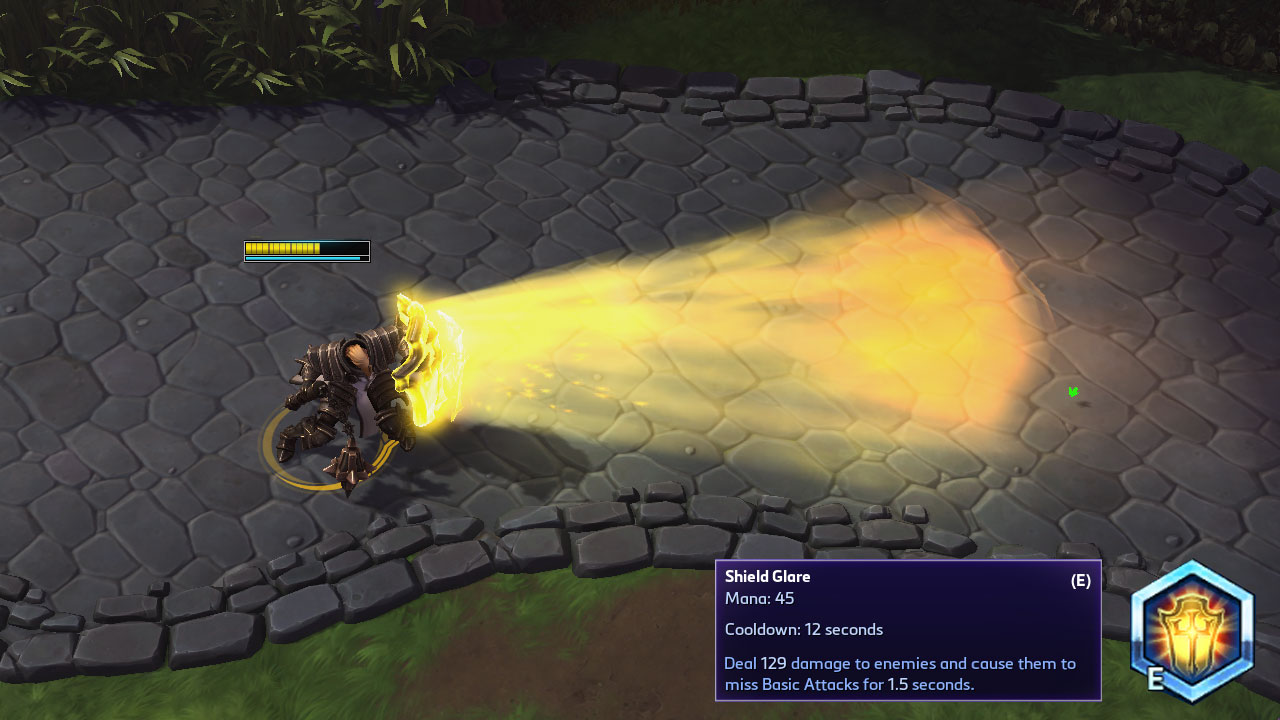
Be sure to frequently use Shield Glare on auto-attack heroes, such as Illidan, Raynor, Valla, Falstad, etc. Don’t just spam it, though. Use it during key moments when the enemy team focuses one of your friends; if the enemy Tyrande lands a stun with her Lunar Flare (E), blind her Raynor and Valla teammates so their followup damage is minimized.
On maps like Cursed Hallow or Dragon Shire, Jo can use Shield Glare’s long range to safely interrupt enemies channeling on objective points.
Even though it doesn’t do much damage, Shield Glare can help score kills on low HP enemies that would otherwise be able to flee to safety. With the “Holy Renewal” talent at 16, Shield Glare doubles as a powerful self-healing ability during team fights.
Heroic Ability #1 – Falling Sword (R)
You should probably never use Falling Sword, as Blessed Shield outclasses it heavily. While the 2 second stun and 50% slow are strong, the move takes far too long to land, which makes it difficult to combo with. It does have a fun gimmick in that it can be used as an escape (you can activate Falling Sword and fly over terrain to escape a fight), but that’s about all it’s good for.
Heroic Ability #2 – Blessed Shield (R)
Deal damage and stun the first enemy hit for 1.5 seconds. Blessed Shield then bounces to 2 nearby enemies, dealing damage and stunning them for 0.75 seconds.
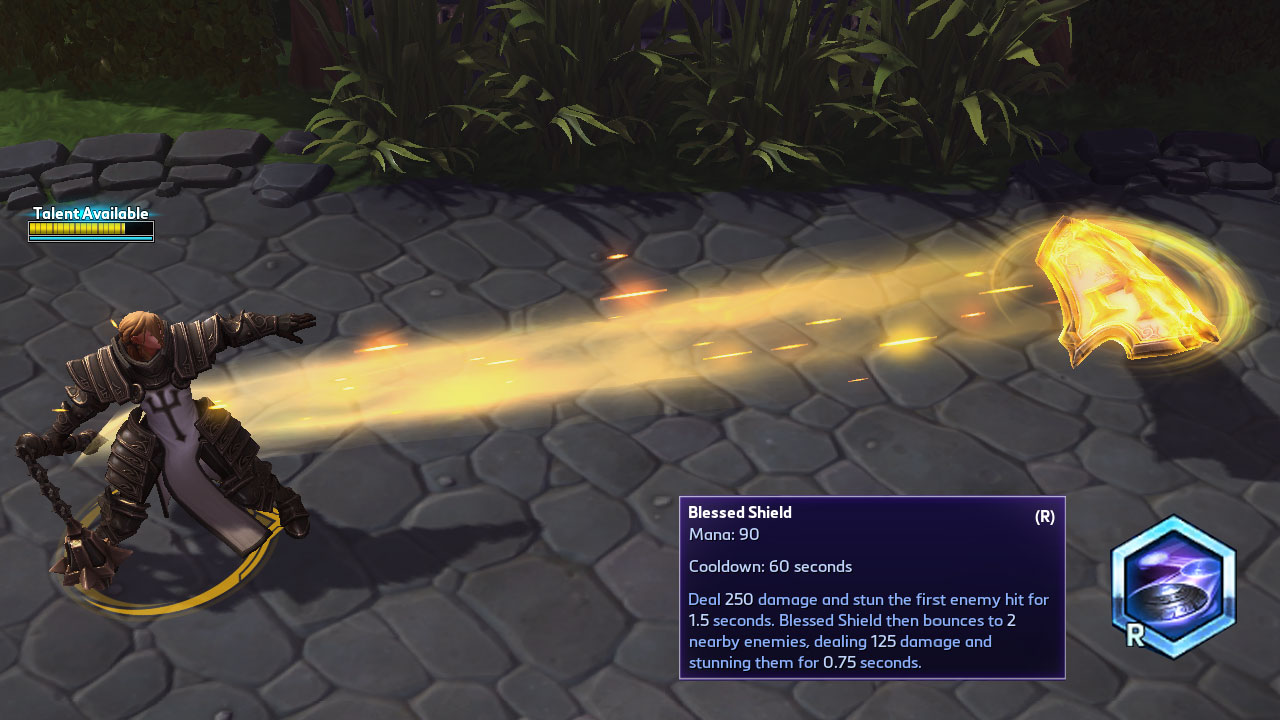
Blessed Shield is fantastic. It synergizes wonderfully with Condemn, which itself already stuns multiple enemies for 0.25 seconds. If you combo three enemies after Condemn pulls them in with Blessed Shield, you’re getting a 1.75 second stun on the primary target and a full 1 second stun on the two bounce targets. And then you still get a Punish followup to slow their escape after that!
If the enemy team is running away, you can reverse the process and initiate with Blessed Shield, stun three of them, then run in and Condemn into Punish combo.
The move’s short cooldown of 60 seconds means it will almost always be available during team fights.
Since it’s available so often, it can also sometimes make sense to use Blessed Shield defensively. If your team is fleeing from a dodgy encounter with the enemy, you might consider using Blessed Shield to aid the escape. You can even stay behind after the Blessed Shield for further distance-making via a Condemn into Punish, then activate Iron Skin to cover your exit.
Talent Build
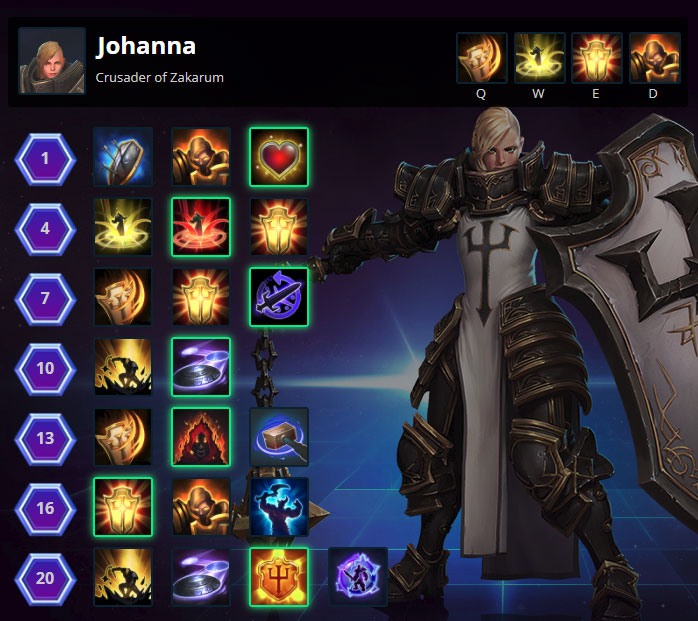
Here’s the build that I recommend for the November 2017 Alexstrasza patch. Let’s go over the details a bit:
Level 1 — Laws of Hope
Laws of Hope is almost always just too good to pass up. Jo already has more than enough innate defense, so the passive regen and active heal over time are exactly what she needs. The active’s cooldown is only 40 seconds, so you will be able use it frequently. In niche situations against very auto-attack-heavy teams, Reinforce can see some use, but Hold Your Ground fills a similar space and works against ability damage as well as auto-attacks.
Level 4 — Conviction
Conviction’s added speed during Condemn makes it that much easier to catch enemies and set up combos, so it’s the go-to. However, on maps such as Infernal Shrines where you are especially focused on killing skeletons for the objective, Eternal Retaliation can be a solid choice. Hitting so many targets can give Condemn a near constant up-time, but beware that your mana will deplete very, very quickly. I’ve never been able to find much of a use for Sins Exposed, it just isn’t very much damage and either of the other two talents will almost always be better.
Level 7 — Blessed Momentum [or] Subdue
Since Jo’s base kit is so strong, Blessed Momentum allowing her to use the Condemn and Punish combo more frequently is a no-brainer. Subdue’s baseline +20% slow is surprisingly strong; it’s become my go-to pick over Blessed Momentum in most games. If you hit 4 enemies at once and complete the quest, the slow no longer decays, which is amazing. Zealous Glare is niche and usually not worth it at all. While the potential of a 3-second blind is amazing against auto-attack enemies, Jo will only be able to get that bonus on one enemy at a time, which can lead to tunneling and a neglect of her primary role of disrupting and setting up combos.
Level 10 — Blessed Shield
As mentioned above, this is probably the only pick you should ever make.
Level 13 — Holy Fury
Holy Fury is great because you are going to constantly be doing damage to all of the enemies around you, which really adds up in long fights. It also gains extra damage for each enemy hero hit by Condemn, but this happens pretty naturally so you don’t need to worry about it much. Should you want a bit more control and burst, you could instead choose Blessed Hammer. You can get more Punish damage with Roar, but this extra damage isn’t very appealing compared to the other two options.
Level 16 — Holy Renewal
This is probably the most flexible tier overall, though it’s hard to argue with the usefulness of Holy Renewal. It can pump out some serious self-healing in team-fights. Still, Imposing Presence can be a very solid pick when facing teams that are heavy with auto-attack heroes. Fanaticism is probably the least-likely pick in the tier, but its speed-boost and extra Iron Skin duration can potentially make it a worthy pick.
Level 20 — Indestructible
It’s really hard to pass up Indestructible. The breaking of will that occurs when the enemy team finally manages to kill Jo, only to realize she laughs in the face of death and gets a GIANT shield, is amazing. I’m not a fan of the Blessed Shield or Falling Sword talents at 20, but Blinded by the Light can definitely see some use if you really need to protect your teammates that extra bit. It’s a stronger version of Storm Shield that has its cooldown lowered each time Jo hits an enemy hero with Shield Glare.
Notable Hero Synergies
Jo works well with everyone, but mages such as Jaina or Kael’thas are particularly devastating with her. Their huge area-of-effect burst damage spells play wonderfully off of Johanna’s Condemn > Blessed Shield > Punish combo. Throwing a Malfurion into the mix as the support character makes this composition extremely potent, as Malfurion’s ‘Entangling Roots (E)’ can combo Condemned enemies, locking them in-place for followup damage.
While Jo definitely plays best with mages, that’s not to say she doesn’t do well with auto-attack heroes. For instance, Raynor does particularly well with Jo if he picks up the “Executioner” talent at 16; the slowing effect on Jo’s Punish makes enemies take 30% more damage for 3 seconds from Executioner-empowered auto-attacks.
And speaking of auto-attacks, LiLi is another great support pairing for Johanna. Since they both have Blinding abilities, together they can make an enemy auto-attack Assassin’s life miserable.
Hero Counters and Map Disadvantages
Johanna brushes away adversity, “like chaff before the wind!” She isn’t really countered by any character and she does perfectly well on every single map in the game.
 Johanna is an extremely effective and versatile character with a relatively low skill cap. She works with every team composition, she does well on every map, and she has no hero counters. What more could you ask for? This is a character that every Heroes of the Storm player should have in their pocket.
“The Crusade calls!”